I have been trying to organize my collections photos. One key part of that is transferring content into the computer where tagging, captioning, and annotation is easy. Getting the photos into the computer satisfactorily has proven to be a challenge.
For many pictures the only sensible alternative is to send your pictures to a professional scanning organization. In an hour you can only scan about 32 photos, extrapolating to scan everything is depressing.
Nevertheless, I want to digitize some images myself because they are fragile or because they are not organized enough to send away in a coherent manner.
I struggled recently with two pictures. Neither is a great photo, nor are they extremely important to me, though I have fond memories of the times and places they were taken. I first scanned with my flatbed scanner, an Epson Perfection V100 Photo. The scanner produced unusably bad results on glossy photos and on textured photos.
I have read that texture problems can be defeated by scanning a photo, rotating it 180 degrees, and scanning it again. Then, registering and blending the two photos will help remove the specular reflection (bright marks) from the texture. In my experience rotating and registering two photos like that would require lots of work. Such techniques do not help with glossy photos.
Another technique is to use a camera and copy stand. With proper illumination and careful color control a copy stand should be able to get rid of most of the texture reflections and surface haze. It can be much, much faster too—you can digitize as fast as you can change pictures.
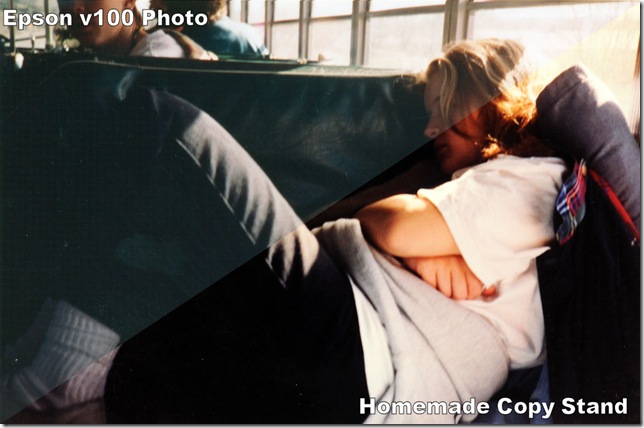
The following two comparison shots show the problem and the improvement available by using the copy stand. In the first one the picture has a dreadful haze, even after being cleaned with PEC-12 and PEC Pads. The copy stand solution is superior.
The next photo shows a textured print that left an orange-skin texture of bright white micro-lines in the scanned image. I processed this with a “small scratch remover” filter in Corel Paint Shop Photo Pro X3. I believe that filter is simply a median filter, and I do not like the artifacts it leaves.
Not all of the texture was gone using the copy stand. But the haze was, and enough of the texture was removed to produce a much more pleasing result.
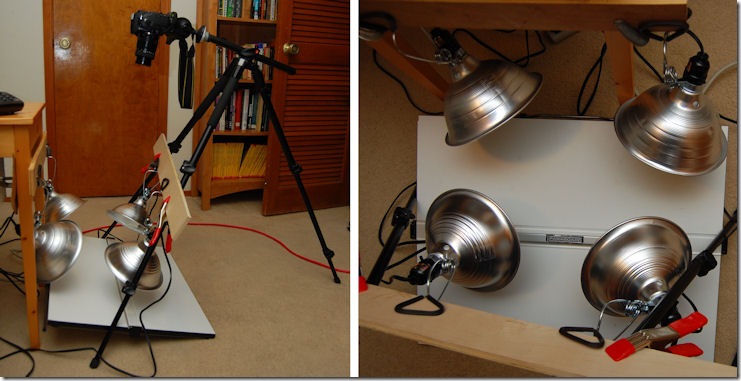
Copy stands, purpose-built, are quite expensive. I created my own with four lamps, a tripod, and some clamps. It is fiddly to set up and miserable to change photo size because I have to move the camera closer or farther away. Still, the copy-stand only materials cost less than $30.
The people in the pictures will remain anonymous, unless they wish me to share their names, or of course, remove their photos.


Comments
3 responses to “Digitizing Old Photos”
I’m surprised at how crappy the scanned results are. Can’t say I’ve ever had issues with scanned images, but I’m sure the results vary by scanner. Nice results though from the copy stand, and yes, definitely faster! What kind of bulbs do you have in the lights? Are you having to color adjust at all due to them? Did you do a custom white balance before shooting? What are you doing about images not being flat, since I know most of the prints I have are all curled to some degree?
Most scanned images have been fine, but the more I’ve done the more problems I find. I understand that better scanners have more appropriate angles between the sensor and the light, and that will help.
The bulbs are compact fluorescent, the “Ecosmart” brand labeled as “daylight compact fluorescent” and “100 watt equivalent”. I didn’t want incandescent due to the heat. Warning, I’ve had friends note problems with fluorescent lights due to the flicker. I got consistent exposure on everything I tried. I would expect the flicker to be about 120 Hz, and I’m stopped down to f/9 at equivalent ISO200. I’m exposing for 1/125th of a second, so I would expect flicker to be a problem if it is going to be.
I do a custom white balance on an 18% gray card before I shoot anything. I tried tuning color balance in post-processing, and I have not been able to get better than the custom present except where the photo was faded or otherwise color wrong to begin with.
Most of my images are fairly flat. My strategies used so far are two-fold:
1) hand bend the images just enough to get them fairly flat, mostly to prevent specular reflections.
2) shoot with a small aperture, so the depth of focus encompasses the wrinkle
If I have problems I do have some strategies. I have an 8×10 inch piece of gallery glass that I got from Michael’s. This is an anti-reflective glass and should help control second images. I would just lay this glass on top of the image and snap away. Second, I could fiddle with focal length. I think a longer focal length would help.
My macro (100 mm Phoenix brand) has a focus control that drifts dreadfully. This lens is the reason people blather on about “build quality” all the time. I have shot with my Nikon 50 mm and Nikon 35 mm primes for larger pictures, and I’m really impressed with the quality there, but it is a little more sensitive to glare. If I had major problems I’d get out my long zoom. Trouble is at 185 mm (or whatever it really goes to–not 200 mm) it is pretty distorting for copying pictures.
I use daylight balanced compact fluorescent bulbs for the product photography work I do, and as long as you get enough of them pointed at your subject, they seem to work great.
Glad you’re doing the gray card…certainly makes life easier!
Does the front element of your lens rotate during focus? If so, you could probably just use a small piece of tape to keep it in place.
Sounds like you’ve got things pretty much under control. Good luck with the pile of pics!