
Maybe you’ve stored 100 pounds of wheat kernels, 75 pounds of beans, barrels of water and you’re all set for whatever municipal unreliability may bring. One question:
How will you cook the food you’ve stored?
In Food Storage and Refried Beans, back in April 2009, I determined that to cook 100 pounds of beans would take about 4.7 gallons of white gas (Coleman fuel). Assuming the rest of a typical day takes a little less gas, you would still have to store about 10 gallons of gas to service that much food. While this is doable, it is certainly a hazardous amount of fuel. My personal solution is my own take on the Rocket Stove.

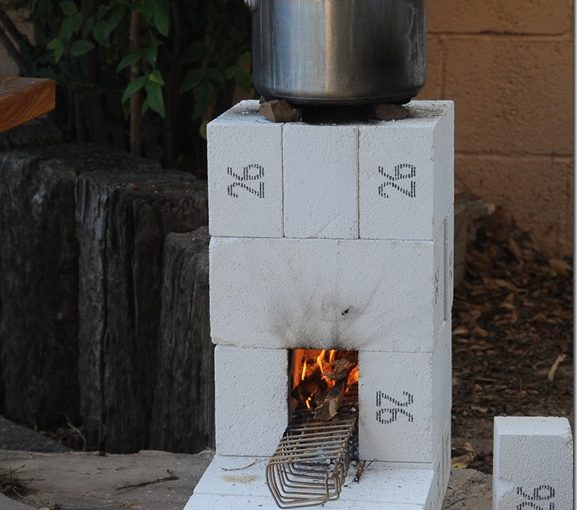
We have a wood burning fireplace, but it is not set up for cooking. However, we keep wood around for the cold winter nights. Obviously, mankind has cooked on wood basically forever. So, obviously it is possible. I was introduced to the rocket stove developed by Aprovecho, which is intended to reduce fuel consumption by more efficiently transferring the wood’s energy into the cookpot, reduce air smoke and soot inhalation by combusting more efficiently, and improve burn safety. They have ten design principals, summarized:
-
Insulate around the firebox. I do this by using insulating kiln brick (about 0.65 g/cm3).
-
Place an insulating short chimney directly above the fire. Mine is about 9 inches high, made by two races of insulating brick.
-
Heat and burn (just) the tips of the sticks. The shortness of the firebox accomplishes.
-
Heat is regulated by the amount of fuel. I have no damper, which their research shows is not effective.
-
Maintain a good fast draft through the fire. This is accomplished both with the chimney and a recovered steel grate that creates an air channel under the burning fuel.
-
Too little draft makes excess smoke. See principle 7.
-
The opening, size of spaces, and chimney should all be about the same size. Specifically they recommend a 12 cm square opening (4.75 in), which is about 3.5 inches, and is probably slightly too small.
-
Use a grate under the fire. See principle 5.
-
Insulate the heat flow path. My entire structure is made of insulating kiln brick.
-
Maximize heat transfer to the pot with properly sized gaps. I have not yet begun this phase of development.
For an initial design I used twelve insulating kiln bricks. Four make a floor—insulated enough, I think, to be used on a wooden stand. Two were cut into plugs to make the sides complete, and the remainder were stacked to make a square chimney and burn chamber. The burn chamber as seen through the chimney is filled with embers.

I scrounged and bent a wire rack to make a grate that retains a channel for air flow under the combustibles.

On top I used four small stones to make a burner. This is very much the wrong design for quickly heating water, but it worked for a test run.

Actually, it worked for three test runs. Yesterday we boiled water for tea.

This morning the kids helped make oatmeal on it. This evening I caramelized onions on it while grilling burgers.
My impression is that this device is the bee’s knees! The smoke was minimal (not as minimal as I would have liked, but largely avoidable). The amount of wood burned was about 4 linear feet of thumb-diameter sticks. The stove is stable, even with my crummy burner. I think it would make a nice patio fireplace for autumn evenings. Small, but controlling the smoke makes it much more pleasant to be around.
I do look forward to improving it. It is a pain to move, since it is about 45 pounds and doesn’t hold itself together. It is too low to cook on comfortably. Its heat transfer are near the pot is not well sized. This all requires work. I would also like to measure the efficiency of the stove. Always more fun to have!